Domain Configuration
Configuring your domain to send emails is the first essential step to using the Email Notification Node. This process verifies that you are the legitimate owner of the domain and authorizes PushFire to send emails from that domain on your behalf.
Where to Configure the Domain
Domain configuration is done from the PushFire dashboard:
- Go to your project and open Settings.
- In the sidebar menu, under Emails, select Domain & Sender.
- On that page, you can add your domain, view DNS records, and verify the domain.
The Domain & Sender page is where both the domain and its associated senders are managed. The domain must be verified before you can add any senders.
Step-by-Step Guide
Follow these steps to verify your domain from start to finish:
Step 1: Add the Domain
In Domain & Sender, if you don’t have a domain configured yet, you’ll see a form with:
- Name: The domain name you want to use for sending emails (for example, updates.yourdomain.com or mail.yourdomain.com). You must own this domain.
- Region: The email provider region (for example, North Virginia, EU West, São Paulo, Tokyo). Choose the region closest to your audience for better performance.
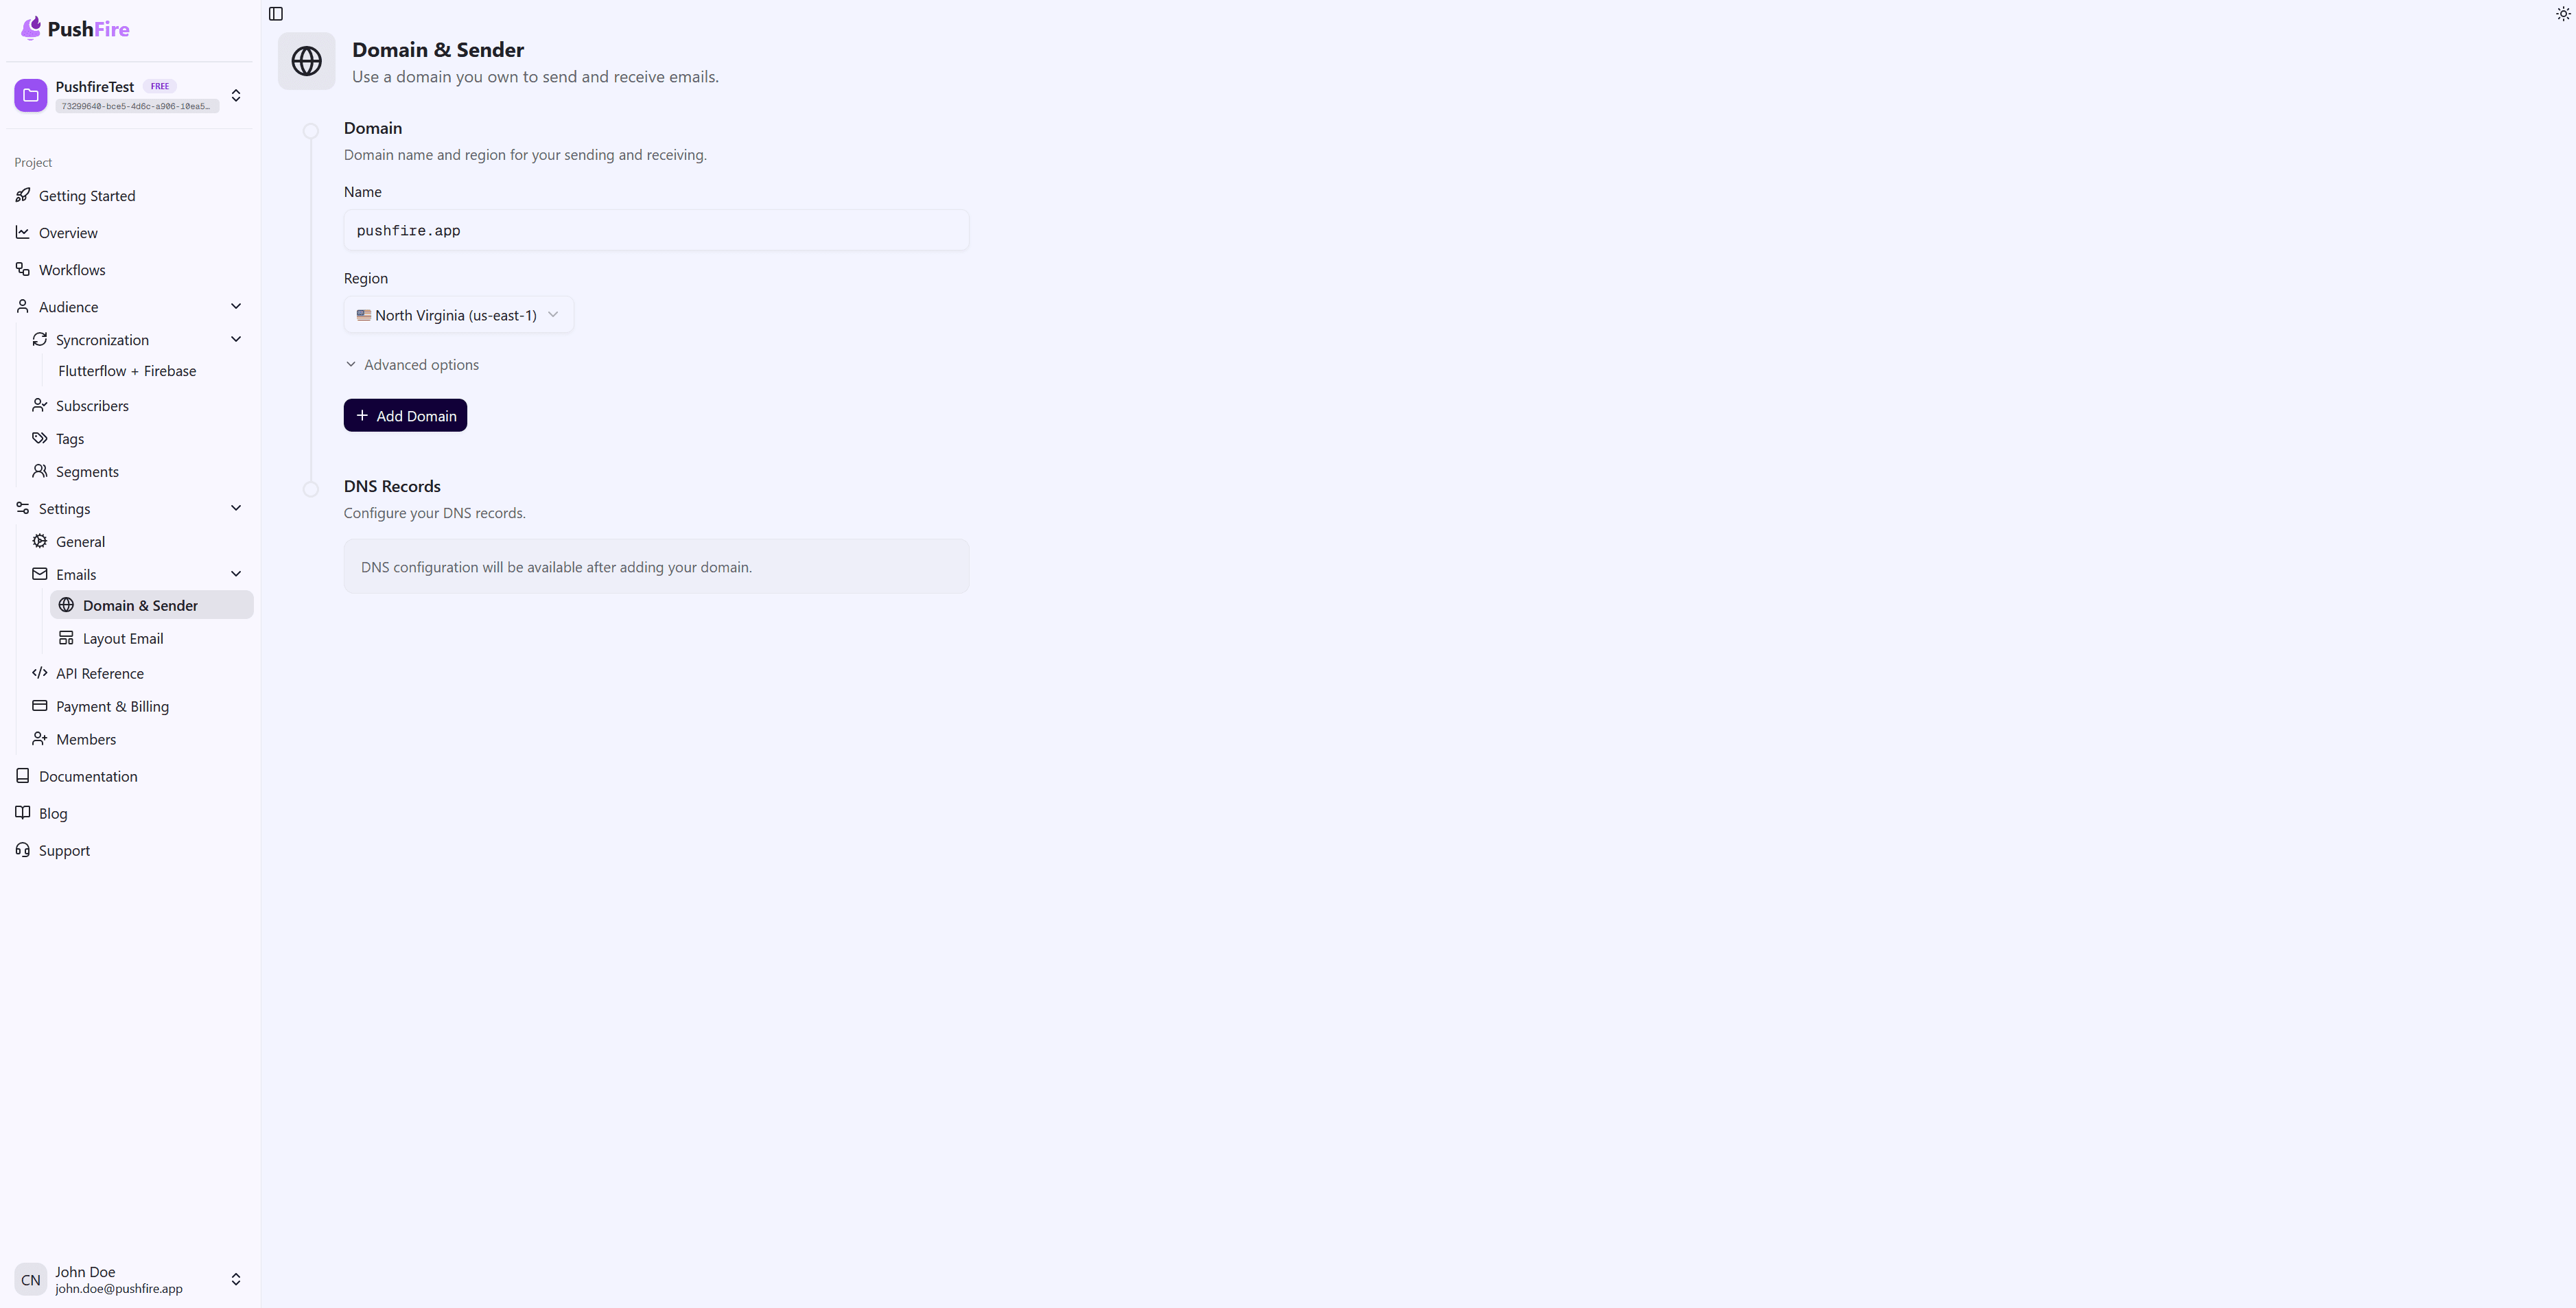
Click Add Domain. PushFire will register the domain and generate the required DNS records.
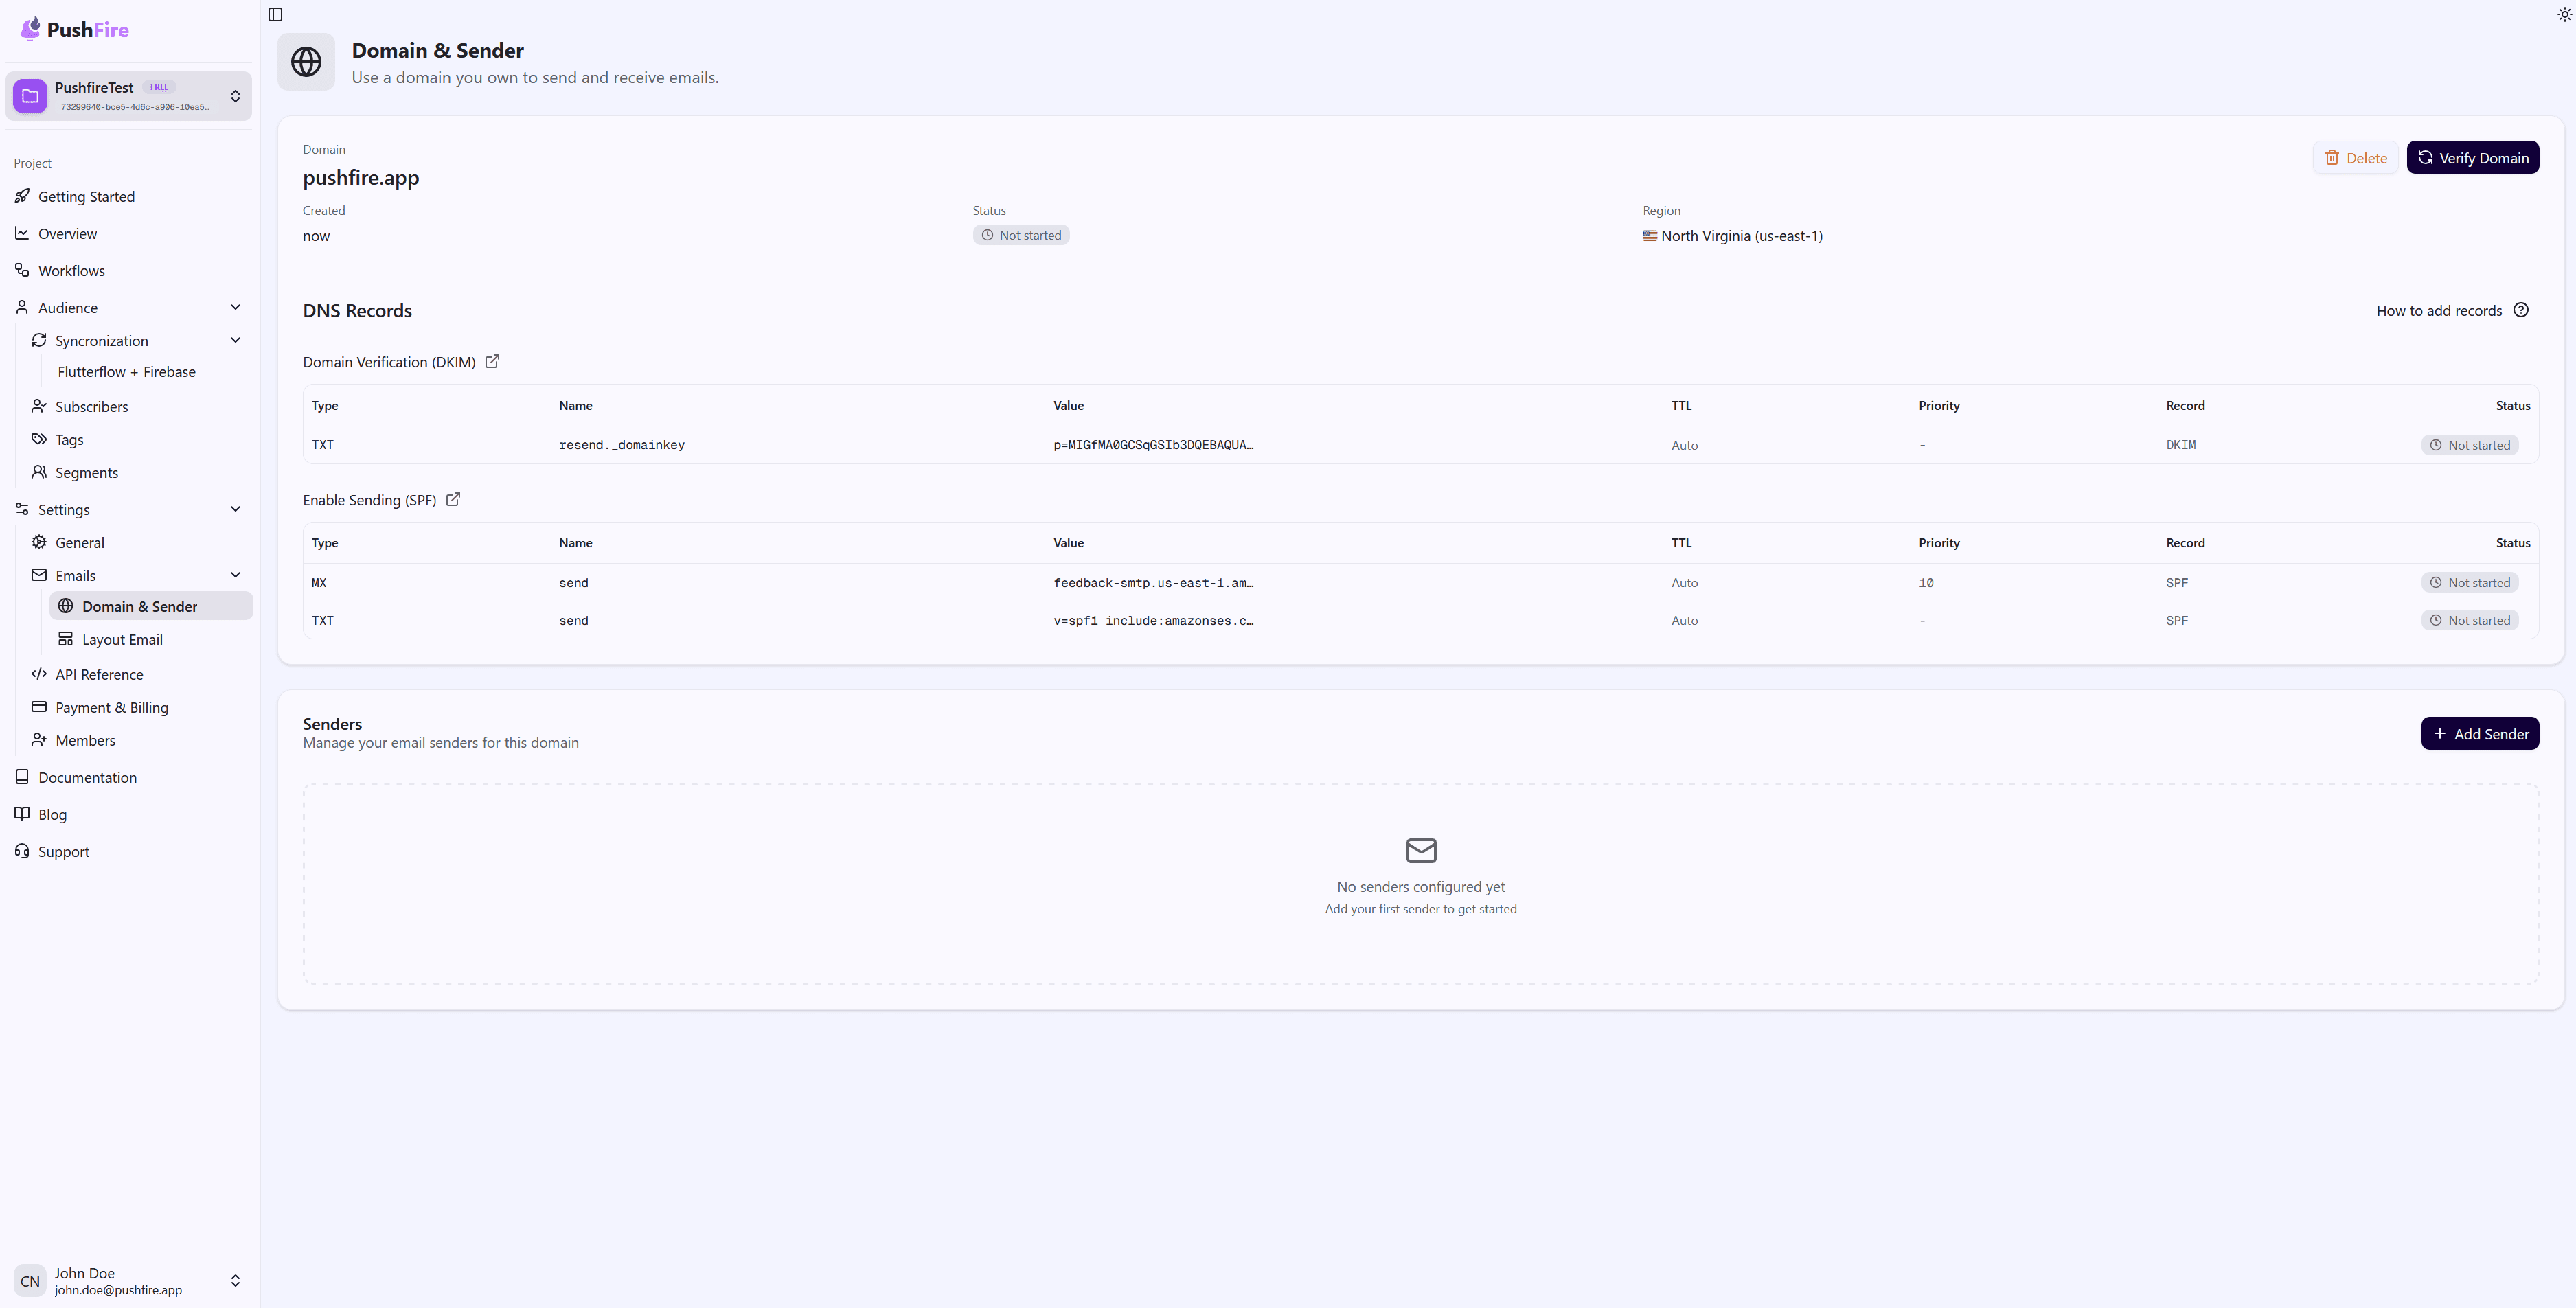
Step 2: Get the DNS Records
Once the domain is added, the interface will display a domain card and a DNS Records table. Records are grouped by type:
- Domain Verification (DKIM)
- Enable Sending (SPF)
- DMARC (optional)
- Enable Receiving (MX), if applicable
Each row includes Type, Name, Value, TTL, Priority, and Record. You can copy each value using the copy button next to the field. You’ll need these values in your DNS provider.
Step 3: Add the Records to Your DNS Provider
Log in to your domain registrar or DNS provider (for example, Cloudflare, Namecheap, GoDaddy, Route 53) and create one record for each row shown by PushFire. Make sure the type, name, and value match exactly.
For detailed instructions on how to add each record type, see the DNS Configuration guide.
Step 4: Verify the Domain
After adding all records in your DNS provider, return to Domain & Sender in PushFire. You’ll see a Verify Domain button (or Re-verify Domain if you’ve tried before). Click it.
PushFire will check that the DNS records are published and correctly configured. This may take a few moments.
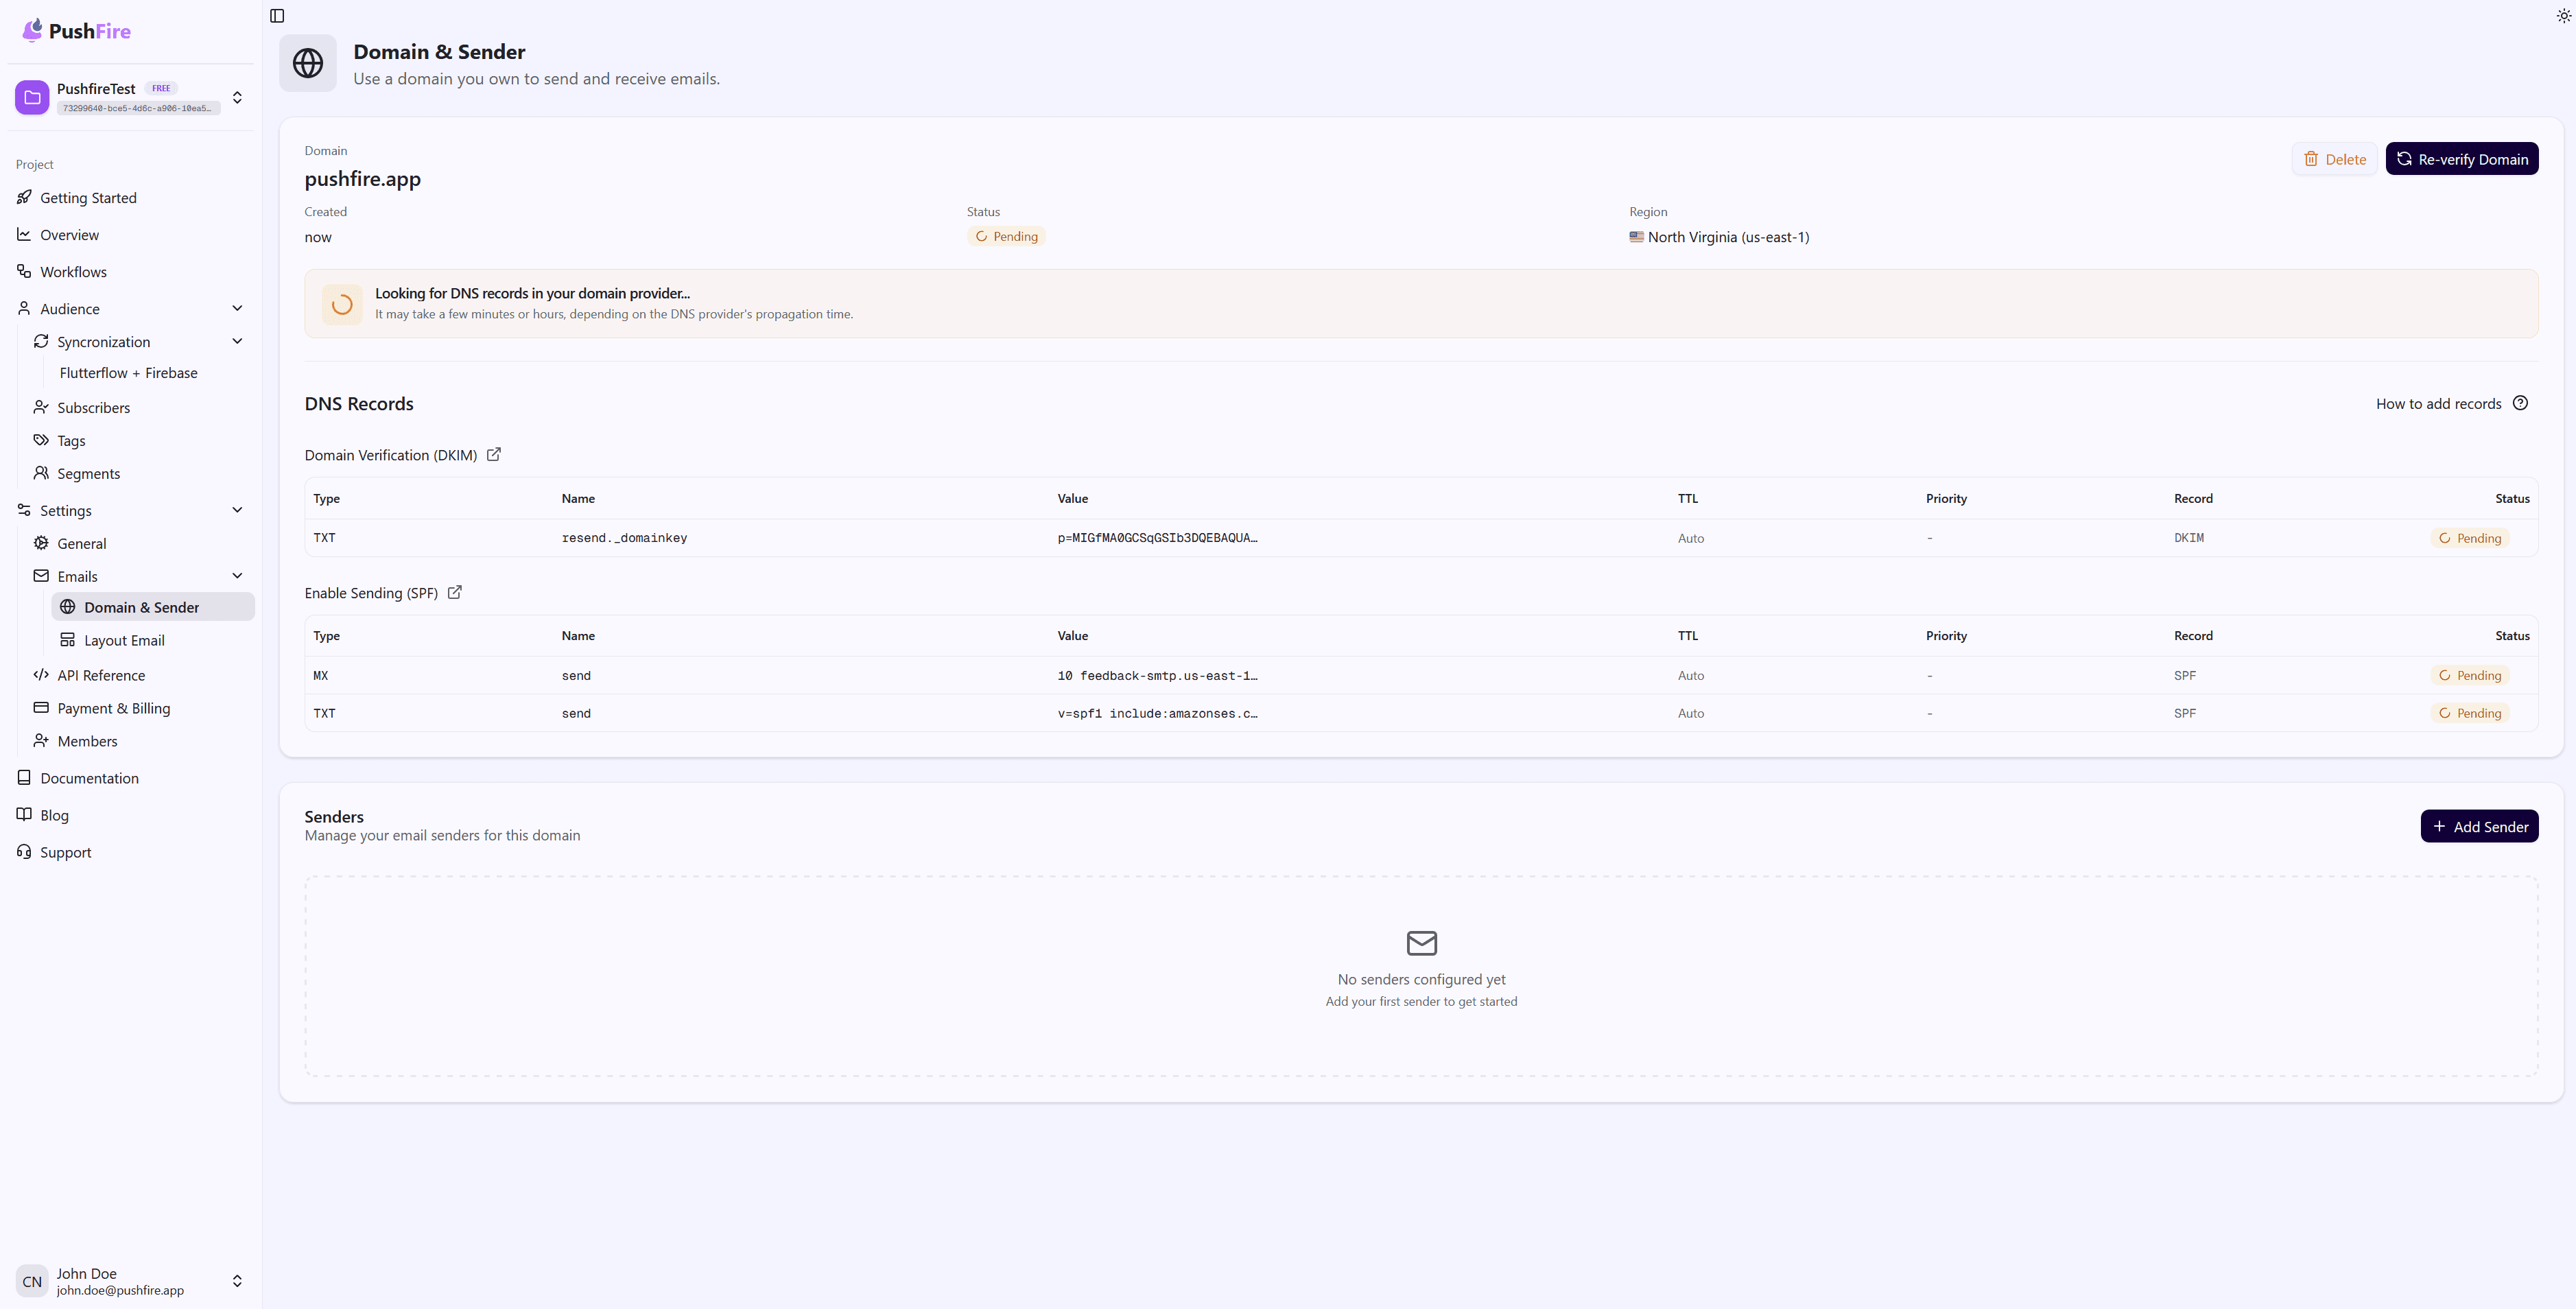
Step 5: Wait for Propagation or Re-verify
- If verification fails, it’s usually because the DNS records haven’t propagated yet or there’s a configuration error (incorrect name/value, extra spaces, etc.). Double-check the records in your DNS provider, wait a bit if needed, and click Re-verify Domain again.
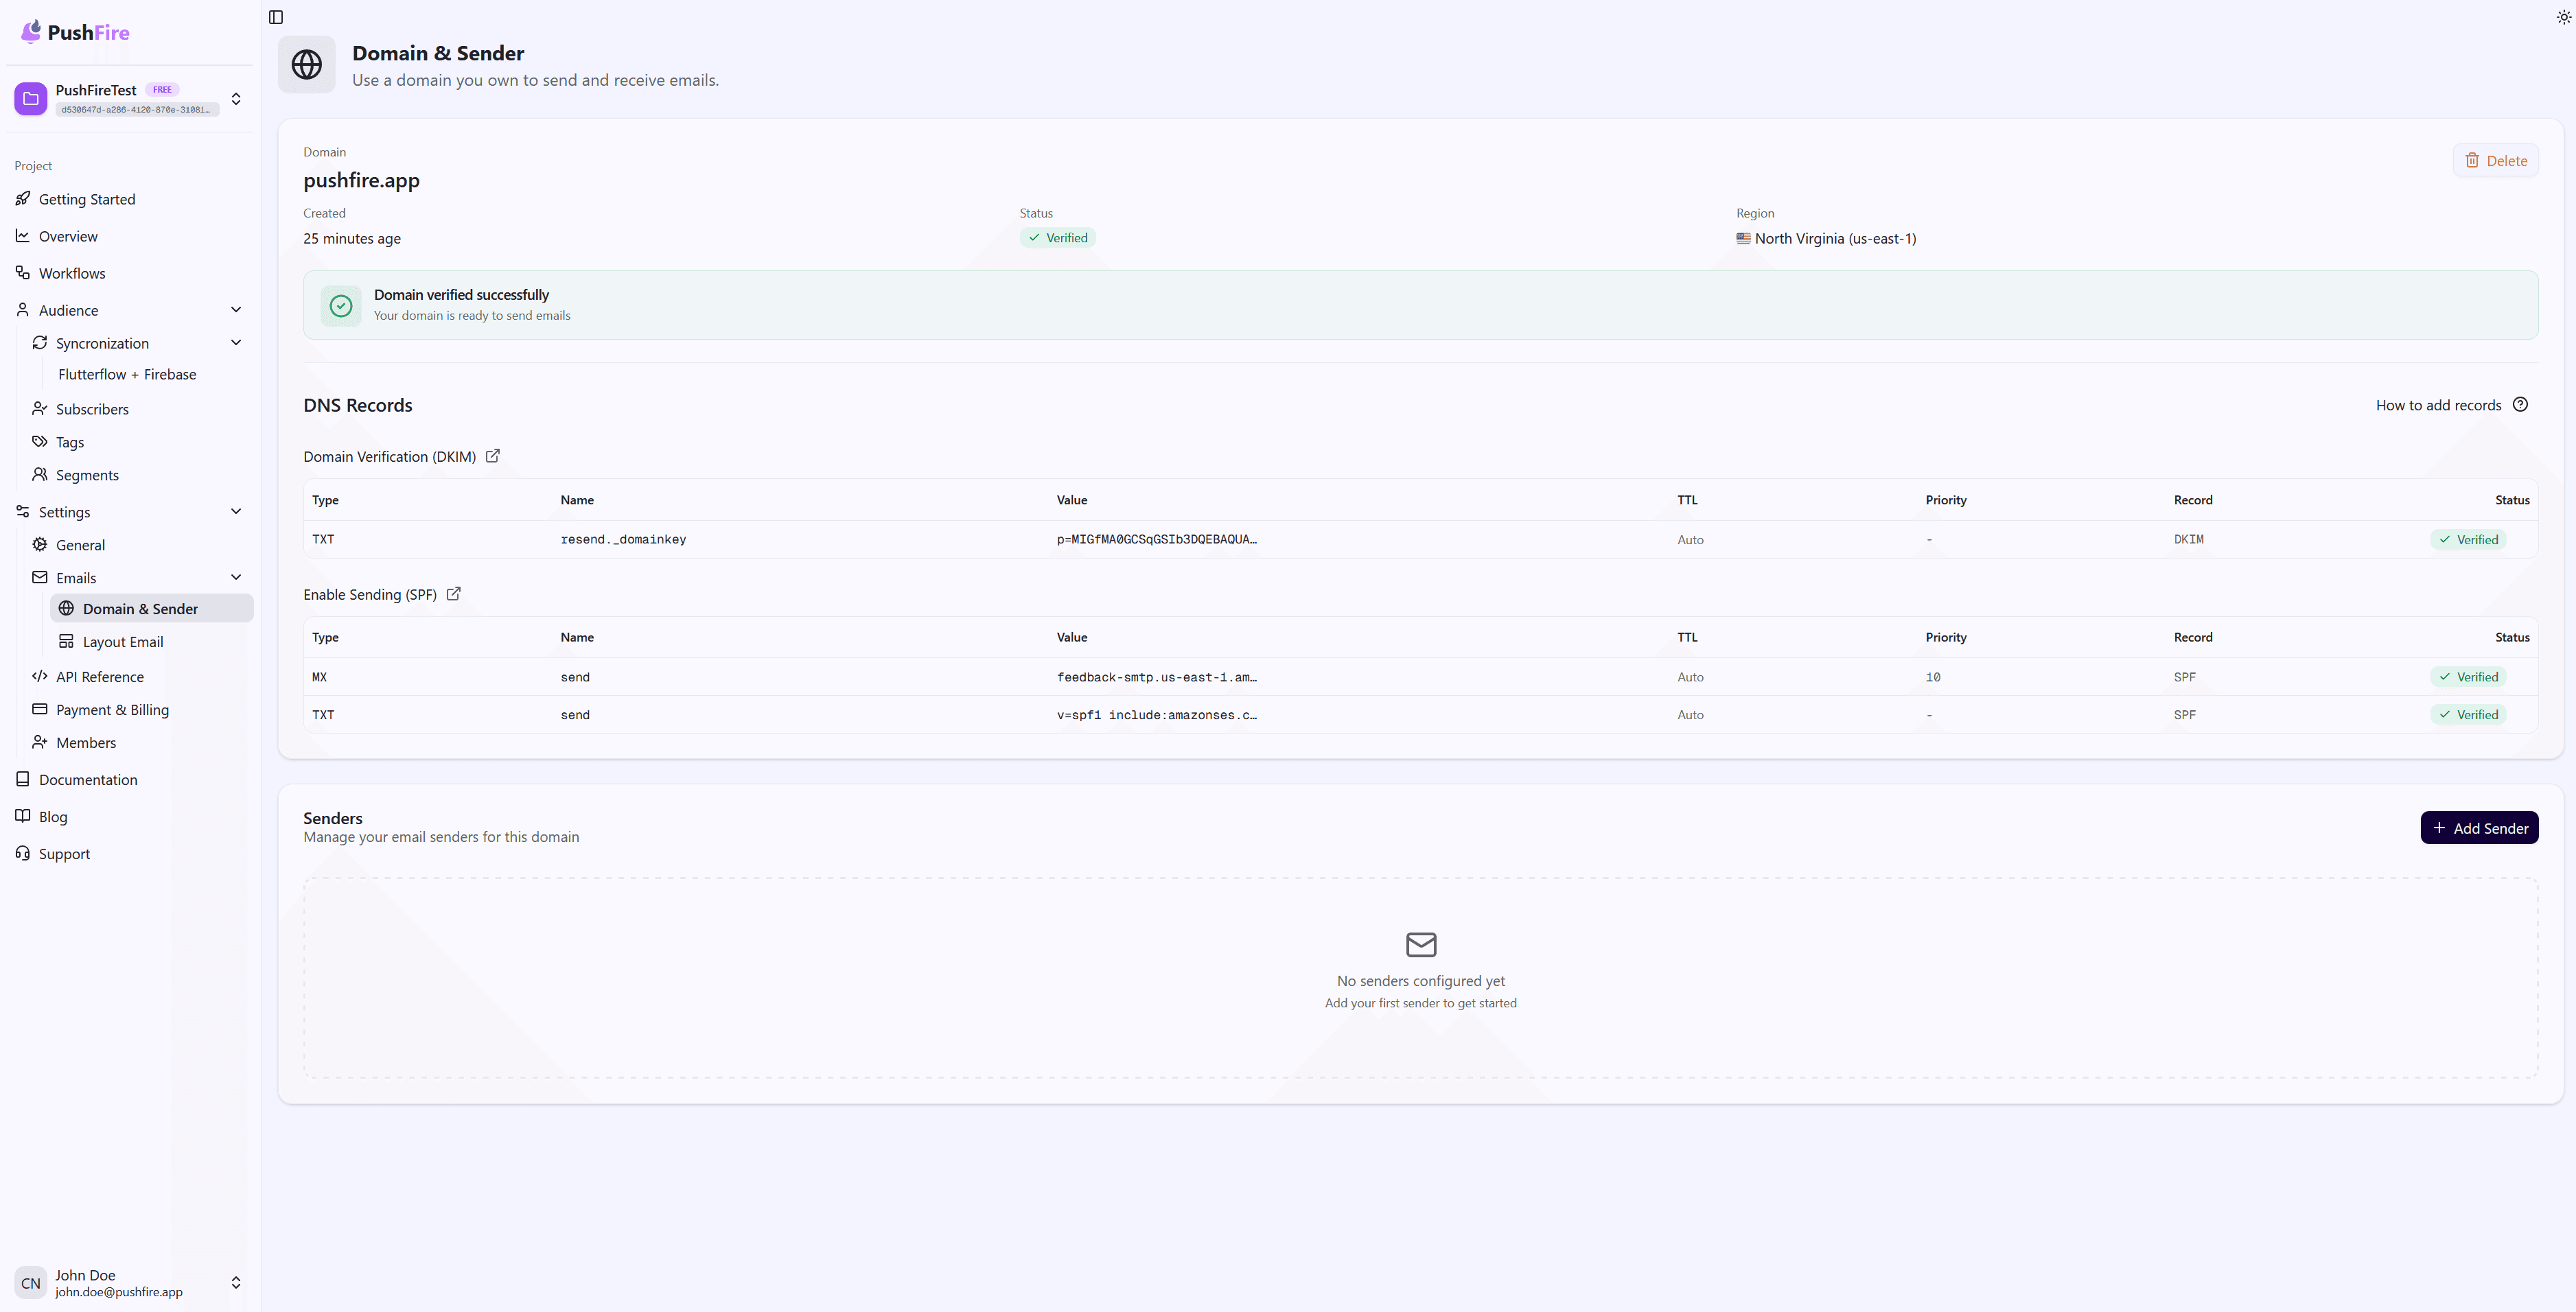
- If verification succeeds, the domain status will change to Verified, and you’ll be able to create senders on the same page to start sending emails.
Why Domain Verification Is Required
Domain verification is critical for several reasons:
- Authenticity: Confirms that you are the rightful owner of the domain and prevents others from sending spoofed emails using it.
- Deliverability: Email providers like Gmail and Outlook trust emails from verified domains more, increasing the chances that your messages reach the inbox instead of spam.
- Reputation: A verified domain allows you to build and maintain a positive sending reputation over time.
- Branding: Sending emails from your own domain reinforces your brand and increases user trust and recognition.
How Domain Verification Works
Domain verification relies on DNS records. DNS (Domain Name System) translates domain names into IP addresses and stores information about how emails for a domain should be handled.
When you verify a domain, you add specific DNS records that authorize PushFire to send emails on your behalf. These records include authentication data that email providers validate when receiving messages from your domain.
Prerequisites
Before starting the verification process, make sure you have:
- Administrative DNS Access: You must be able to add DNS records for your domain, usually through your registrar or DNS provider’s control panel.
- A Domain You Own: You can only verify domains that you own.
- PushFire Permissions: You need admin permissions in your PushFire project to configure domains.
What to Expect
Domain verification typically takes anywhere from a few minutes to several hours, depending on:
- DNS Propagation: After adding DNS records, it takes time for changes to propagate across the internet.
- DNS Caching: Many systems cache DNS data for performance, which can delay visibility of updates.
- Manual Verification: Once records are set, click Verify Domain (or Re-verify Domain) in PushFire. The system will check the records and update the status, which may take a few moments.
Domain Statuses
In the Domain & Sender interface, a domain can have one of the following statuses:
- Not started: The domain was created but verification hasn’t been initiated. Add the DNS records and click Verify Domain.
- Pending: Verification is in progress. If records haven’t fully propagated, wait a few minutes and use Re-verify Domain.
- Verified: The domain is verified and ready to send emails. You can create senders and use the Email Notification Node.
- Failed: Verification failed, usually due to incorrect or missing DNS records. Review the configuration and try again.
- Temporary Failure: A transient issue (such as DNS or network problems). Try Re-verify Domain later.
Next Steps
- If you need to add or edit DNS records, refer to the DNS Configuration guide for detailed explanations of DKIM, SPF, DMARC, and MX records.
- Once your domain is Verified, configure your senders on the Domain & Sender page to define the email addresses you’ll use as senders.
Related Guides
Continue learning with these related guides