
A user downloads your app. They're excited, but also easily distracted. The first seven days are the most critical period in their journey. Get it wrong, and you'll see churn rates skyrocket. Get it right, and you create a loyal, engaged user. The difference is a strategic onboarding push notification workflow.
This isn't about sending a single "Welcome!" message. It's about a timed, intelligent sequence of notifications designed to guide users to their "aha!" moment, educate them on key features, and build a lasting habit.
In this guide, we'll break down the exact notifications you need to send in the first week. We'll show you the goals behind each message and provide a step-by-step plan to build this entire sequence visually using PushFire.
What is an Onboarding Push Notification Workflow?
An onboarding push notification workflow is an automated series of messages sent to a new user during their initial days with your app. Unlike standalone notifications, a workflow is a connected journey with specific triggers, time delays, and conditional logic.
The primary goal is to drive user activation—the point where a new user understands and experiences the core value of your product. A great workflow turns a curious new user into an active, retained user.
The 3 Core Goals of Onboarding Notifications
Before building your workflow, understand what you want to achieve. Every message should serve one of these three purposes:
- Drive Initial Activation: Guide the user to perform the one key action that makes them say, "I get it now!" For a social app, this might be adding their first friend. For a fitness app, it's completing their first workout.
- Educate on Key Features: Your app has powerful features, but users won't find them all on day one. Your workflow should progressively reveal valuable functionality they might otherwise miss.
- Build a Habit and Increase Retention: The ultimate goal is to make your app a part of the user's routine. Timely reminders and value-driven messages encourage them to come back day after day.
The Anatomy of a Perfect 7-Day Onboarding Workflow
Here is a proven, day-by-day template for a push notification workflow that you can adapt for your Flutter app. This sequence is designed to maximize engagement without overwhelming the user.
Day 0 (short delay): The Welcome & First Action
- Trigger: User signs up and is tagged as "New".
- Message: "Welcome to [Your App Name]! 🎉 Tap here to set up your profile and get started."
- Goal: To provide a warm welcome and immediately direct the user toward the first critical activation step. Don't leave them wondering what to do next.
Tip: You don't want to send them a push notification immediately. If they're already in the application and using it, there's no need! Use a delay and only send to users that don't achieve the first few steps of onboarding.
Day 1: The Feature Discovery Push
- Trigger: Wait 24 hours after the welcome message.
- Message: "Did you know you can [Action with Key Feature]? It's the easiest way to [Achieve Benefit]."
- Goal: To educate the user about a valuable secondary feature. This shows them there's more to your app than they initially saw, increasing its perceived value.
Tip: Why wait 24 hours? You don't know the user's habits and timing yet but if a user used the app at this time yesterday, it's the best time to try and reach out to them today.
Day 3: The Value & Social Proof Push
- Trigger: Wait 48 hours after the Day 1 message.
- Message: "You're doing great! Users who [Perform Key Action] are 3x more likely to achieve their goals. Ready to give it a try?"
- Goal: To encourage deeper engagement by using social proof and reminding them of the app's core value proposition.
Tip: Remind users why they came to the app and help them understand the actions they should take to achieve their goal(s).
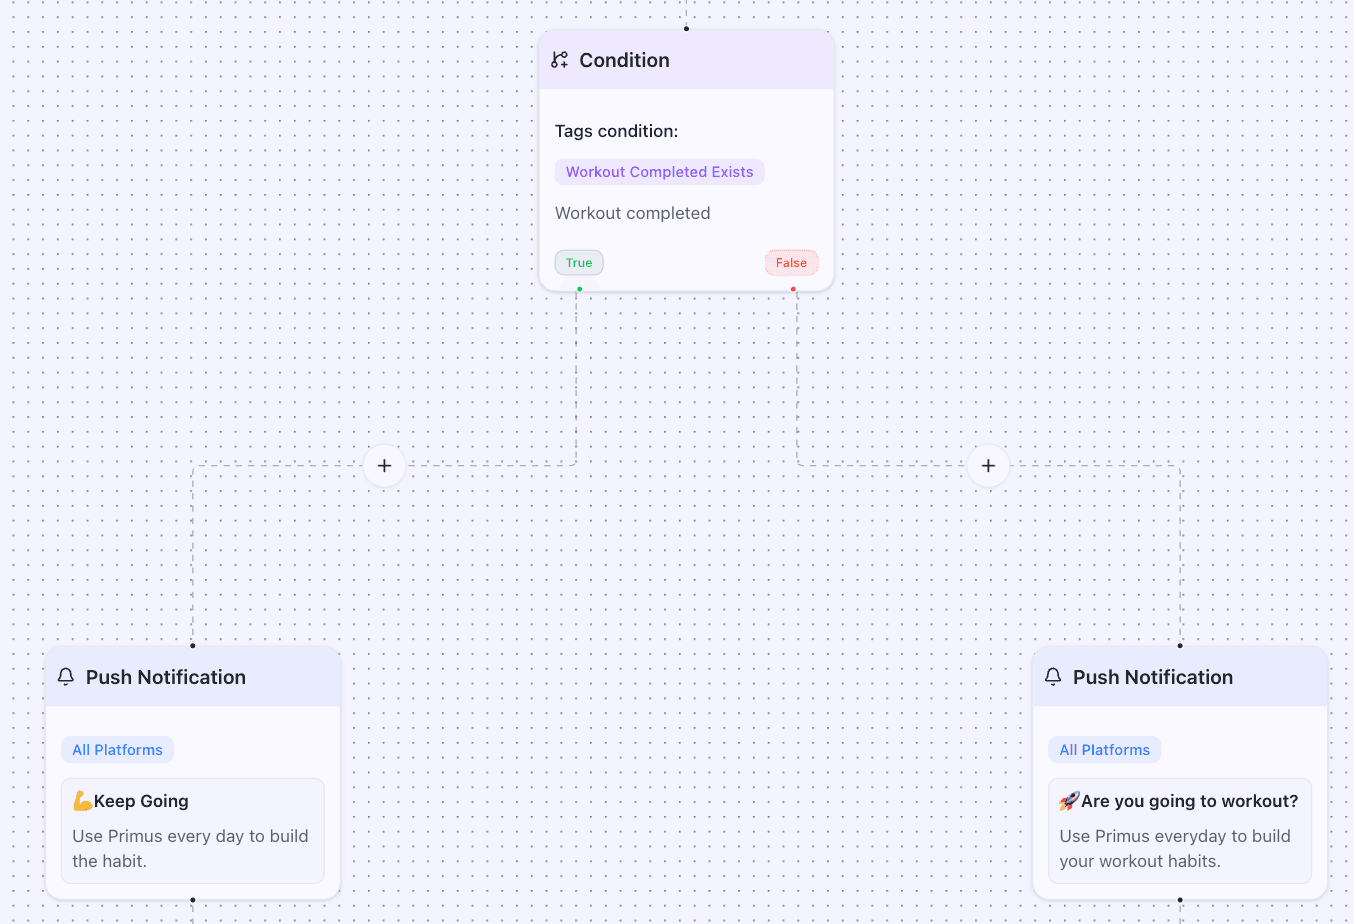
Day 5 (Conditional): The Intelligent Nudge
- Trigger: Wait 48 hours. Now, use conditional logic.
- Condition: Has the user performed the key activation event (e.g., is_paid tag is false)?
- If YES (Activated): "Pro Tip: Use [Advanced Feature] to get even more out of [Your App Name]!"
- If NO (Not Activated): "Unlock the full power of [Your App Name]. Tap here to [Complete Key Action] in just 2 minutes."
- Goal: This is the most powerful step. By using a conditional node, you send a highly relevant message based on the user's actual behavior, dramatically increasing conversion.
Tip: Conditional actions help segment users. By segmenting your users, you can create more targeted messaging.
Day 7: The Habit-Building Push
- Trigger: Wait 48 hours.
- Message: "It's been a week! Time to [Perform a Core, Repeatable Action]. Let's make progress on your goals."
- Goal: To transition the user from "onboarding" to "regular use" by prompting a habit-forming action.
How to Build This Workflow Visually with PushFire
Coding this logic manually is complex and time-consuming. With PushFire, you can build this entire workflow in minutes with a drag-and-drop interface.
- Create Your Workflow: Create your workflow on the 'Workflows' tab.
- Integrate PushFire Into Your App: You'll need to add an API call to trigger the workflow from your application. You can grab the workflow ID from the Workflow's dashboard. This ID looks like 'cf454c2a-9125-41cb-b507-7e6609581a22'. You'll use the Execute Workflow API call to add each subscriber to the workflow. Now back to your workflow in PushFire.
- Drag and Drop Nodes: Add your first "Push Notification" node and write your welcome message.
- Add Time Delays: Drag a "Wait" node onto the canvas and set it to 24 hours. Connect it to your welcome message.
- Incorporate Logic: Add a "Conditional" node after your Day 3 message. Define your branches based on user tags or properties (e.g., is_activated is true/false). Create different push notifications for each branch.
- Launch and Optimize: Connect all your nodes, set the workflow to "Active," and watch as new users get a perfectly tailored onboarding experience.
Expert Insight: "Push notifications are the most effective way to engage your user base. When used properly, they make or break applications." - Erik Goins
Real-World Results: The Proof is in the Data
Don't just take our word for it. A strategic onboarding flow has a measurable impact on key business metrics.
Case Study: Primus, a fitness application, was able to increase user activation by 43% by adding onboarding push notifications.
Conclusion
Your new users are your app's most valuable asset, but their attention is fleeting. A generic, one-off welcome message is no longer enough. By implementing a thoughtful, automated onboarding push notification workflow, you can guide users, demonstrate value, and build the foundation for long-term retention.
Using a visual tool like PushFire removes the engineering bottleneck, allowing you to build, test, and optimize these critical user journeys with ease.
Ready to Stop Losing New Users?
See for yourself how simple it is to build a powerful onboarding experience. Start using PushFire for free today.